Tuesday, December 8, 2015

Snowflake Symmetry

Today the kindergartners created a snow storm of symmetry!

After a quick introduction to the concept of symmetry (shapes that are the same on both sides) , the kindergartners jumped right in to creating their own snowflakes. These snowflakes will be hung up in garlands for the holiday show!

First the kids began by making simple snowflake drawings using white oil pastels on blue squares of paper.

They were encouraged to think about making their snowflakes symmetrical and to add special little details (circles, lines and triangles) to make their snowflakes more interesting and complex.

Symmetrical snowflakes on blue paper
When the kids felt warmed up and confident we got out the watercolors. The kids drew their snowflakes with white oil pastel on white paper (a huge challenge since you can't see what you have drawn!) and then gently painted over their snowflakes with watercolors. Both snowflake design and paint color were entirely up to the artist.

Snowflakes with oil pastel and watercolor
Gorgeous! I will be connecting each child's set of snowflakes into a hanging garland and they will be on display during the MMS holiday show(s)!

NOTE FOR PARENTS: Your children will have 3 pieces of work on display at the MMS Holiday Show: a watercolor winter scene, a pastel fox and a snowflake garland. After the show please take your child's art work home! They make beautiful additions to any holiday decorations.

Tuesday, December 1, 2015

The Sweetest Foxes in the World!

Ready for a sneak peek of the Kindergarten Art Projects that will be on display during the MMS Holiday Show?


 Scroll down and see the beautiful foxes the kindergarten class made today!

Cute Fox Kindergarten Art Project

We began the day with a quick warm up drawing in sketchbooks. The drawing emphasized breaking the image of the fox up into shapes that are familiar and easy to draw. 


With the warm-up complete the kids began work on their final pieces.

Cute Fox Kindergarten Art Project


On large pieces of black construction paper that kids used light colored pencils to draw the initial shapes that make the fox (upside down triangle for a head, circles and half circles for eyes, oval for belly etc.)


Then the kids traced the colored pencil lines with black oil pastel so that the edges would really "pop" when the color was added. 

Cute Fox Kindergarten Art Project

Now for color! Black for the nose and eyes!

Cute Fox Kindergarten Art Project Work in Progress

White for the belly, tip of the tail and circles around the eyes.

Cute Fox Kindergarten Art Project

What color will your fox be today? Artist's choices included: pink, orange and red.
Finally the kids built the world around their foxes, blue skies and green grass! 
See the final pieces below -- and view them in person at the MMS Holiday show! 

Cute Fox Kindergarten Art Project

Cute Pink Fox Kindergarten Art Project

Cute Orange Fox Kindergarten Art Project

Cute Orange Fox Kindergarten Art Project

Cute Red Fox Kindergarten Art Project

Cute Pink Fox Kindergarten Art Project

Cute Orange Fox Kindergarten Art Project

Please let me know what you think! Comments are most welcome!


Tuesday, November 10, 2015

Winter Trees -- Mixed Media

Winter Trees on a Snowy Day

Mixed Media Art Project for Kindergarten Kids

This week, even though the weather has been beautifully mild lately, we are working on creating winter trees (which will later be displayed at the holiday show).

The kids began with the background of our snowy scene. We talked about color and brainstormed about what we thought the colors of a cold winter sky might include. Using watercolor (and lots of water) the kids filled their pages with swirls of winter color.


Then the children began work on a paper mosaic which will (next week) be transformed into trees. For this the kids were asked to glue multi colored squares of tissue paper and construction paper onto a second piece of watercolor paper. This is a sticky job but they did well.

In next weeks class we will take the mosaic papers and cut out trees. These trees will be glued onto the snowy watercolor background. The kids can then add details. Holly berries, snowflakes etc. You will see the final pieces next week!

Also, don't forget to stop in to MMS if you can and see the robots! The kids are very proud of them. They are on display in the main hall and look incredible!


Robots!

Make Your Own Robots! 

Kindergarten robot creations from found materials.

This two week project began with an invitation for the kids to name all the things that a robot can do or be.We talked about how robots are usually made: what parts are typical (head, arms, body and legs) and what parts might be unusual (wheels, lightning bolt hands (!), antennae).


With these ideas as the spark of inspiration, the kids were each given a large piece of construction paper, a bottle of elmers glue and a variety of precut cardboard pieces. They were encouraged to add as many layers and features to their robots as they wanted. They could cut any of the cardboard pieces to suit their needs.


Next class the cardboard robots were painted silver, carefully cut off their construction paper background and laid out to dry. While the robots were drying the kids worked on drawing a space scene on black construction paper. Kids added stars, planets, suns, shooting stars, and moons as they liked. Then the (now dry) silver robots were glued onto the outer space background.


After that I presented the kids with a variety of small found objects: buttons, pennies, beads, sparkles, and pipe cleaners to name a few. They added these to their robots in any manner they liked. As you can see the results were amazing!


Tuesday, October 20, 2015

Leaves are Falling All Around

Kindergarten Fall Leaf Prints 

(And last weeks watercolor exploration is now on display!)


This week, in honor of the arrival of cool, fall weather, the kindergartners made prints using fall leaves!  We began this week with a question:

What is a print? 

Hand prints and foot prints were examples that came readily to mind. From there the children quickly uncovered that a print (in art) is when you press a painted object onto a piece of paper to make a copy of that object. Now we began making prints with paints and leaves!

Supplied with red, orange and yellow/gold paint along with a selection of maples leaves, the kids went to work sponge painting the back (bumpy) sides of their leaves and pressing them onto their black paper. They also had the option of printing with mum flowers to add additional interest to their pieces. Finally all the children were supplied with clean sponges and blue/silver paint and encouraged to carefully dab the blue paint around their leaves and mums... creating a blue sky in the background.


 As you can see they were vibrant with fall colors and quite beautiful. They will go on display outside of Bearville and Poohville as soon as they are dry!


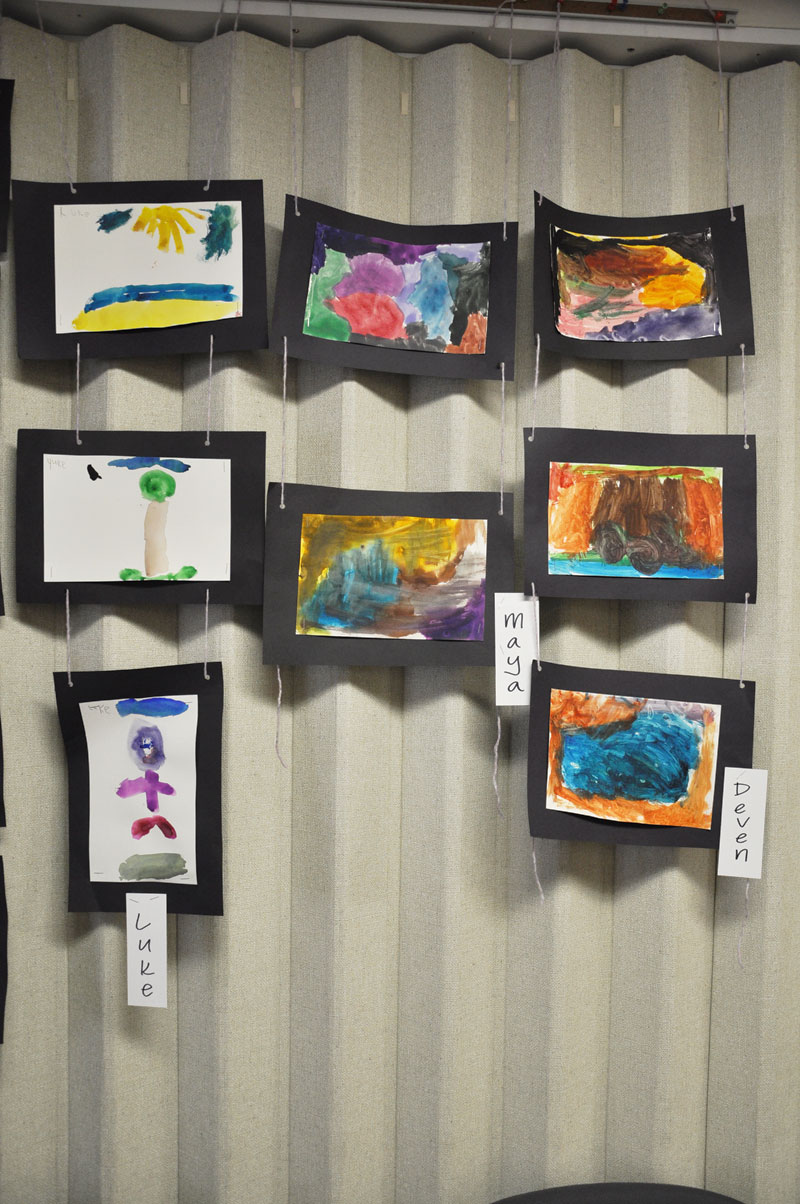
Watercolor Exploration From Last Week is on Display

And for those of you who were curious to see the free watercolor exploration that the children did last week, they are now on display in the main hall of MMS.

Your child's work is displayed vertically.  Close up photos below.


From left to right: Luke, Maya and Deven
From left to right, Benjamin, John and Andrew

From left to right, Andrew, Sameer and "mystery artists" (who forgot to sign their names!)

Parents: a note on viewing your child's art work.

 I know that it can be very hard to refrain from comparing your child's work to others. In fact, it may be impossible. I volunteered for my daughters art class and had a terrible time not intervening to "correct" her when she started veering off the task the teacher had set.

Don't judge like I did! Just remember, when viewing what your child has created that the process and experience the children have while making the art is more important than the final product. They are just begin their journeys into creative expression and the most valuable thing that we can do to help them on their way is to truly value their experience and to support them as they explore new ways to express who they are.

Tuesday, October 13, 2015

Kindergarten Self Portraits -- In Watercolor!

Self portraits have arrived!

Today the children finished (or almost finished) their self portraits!

We began class with a quick lesson on how best to use watercolors. The most important thing is to be sure that you use lots of water! Never let your brush get dry! The kids warmed up with some small free form pieces. They had a chance to get to know their paints and explore what effects they could achieve. The variety was incredible and the finished pieces were so lovely that I will be hanging these around the school as well.


Then we began working on painting self portraits. This is a real challenge for any artist because watercolor is such a fluid medium. It can be a challenge to feel comfortable and confident but the kids worked well. We began by painting the backgrounds, then moved onto clothes and then finally the faces. We will use oil pastels and colored pencils to clarify the eyes and mouths next class and to give the hair a little more definition and texture.


Wonderful, emotional pieces. I can't wait to hang them!

Next class your child can look forward to making some autumn prints!


Tuesday, October 6, 2015

Kindergarten Self Portraits -- Sneak Peek!

It's ME! Early Year Kindergarten Self Portraits


Today we did our first structured drawing class -- the theme was self portraits!
(Plus: Read to the end for a special invitation!)

During this 2 class project the children will be drawing (and then painting) self portraits and make personalized frames. These portraits will be displayed around MMS. They will also be on display at MMS Kindergarten graduation alongside a second self portrait that they will make at the end of the year. You won't believe how much they will grow as artists!

We began our class with some warm up drawing exercises. These are intended just to get the hands moving and to introduce the children to some of the shapes we will be using to draw the features of the face.
Then the kids drew a quick practice portrait. This is where we observed and discussed how the features of the face are arranged. Using a center line and two horizontal lines we divided the head into sections to make it easier to know where and how to add the features.
Then we worked as a class to create the portraits step by step. Next week the kids will be painting their portraits! Adding color will give these sweet faces so much personality! Here are a few sneak peeks of the drawings that were done today. Next week I will include photos of all the completed work. Stay tuned until then!


Conversation starters:
What is a portrait?
What is a self portrait?

Stay tuned for the complete work next week!

 I'd also like to extend a special invitation for you and your children to come to Seven Stones Cafe in Media  during the month of October to see my current art work on display. Here are a few examples of what you will see....


Curious? Swing by on Media's "Second Saturday" (October 10th) between the hours of 6-8pm and I will be there to say hello and answer any questions you and your children might have about the work. I would absolutely love to see you and your children there!


Tuesday, September 29, 2015

Kindergarten Art Quilt -- Squares of Primary and Secondary Colors

Creating an Art Quilt with Hand-Mixed Colored Squares

Last week the children got messy mixing primary colors (red, yellow and blue) and discovered what secondary colors they created. This fun class project left us with sheets and sheets of beautifully painted paper. This weekend I cut these up into squares of varying sizes so that the kids could make art quilts this week.


The children began by filling their paper with a checkerboard of the largest squares. They were asked to really notice how the colors looked together and to choose combinations that they liked.

Once the paper was filled, they layered a second smaller square on top -- again with an emphasis on personal color preference. Finally the children were asked to add a third very small square on top.

Here are the results! Please try to ignore the glue-- I took these pictures in class on Tuesday and the art was not yet dry!


As you can see there were a wide variety of color preferences in general -- as well as quite a variety of what the children liked in terms of color combinations. It is amazing to see how strong and unique color preference can be, even at such a young age.

At the end of class, we had a little class "quiz" where all the children reviewed together what the primary and secondary colors are. They knew it well!

As a side note, we did discuss (and you may have heard) that in art class there are no "boy" or "girl" colors. I feel that it is important in art class for the children to feel totally free and safe to explore their creativity. Worrying about being judged is a hindrance to freedom of expression. So with gentle reminders (if needed), we work towards commenting on each others (and our own) work with sensitivity and kindness.